
Are you planning on giving gifts to loved ones & friends any time soon? If you are like me, & love personalizing your gifts & gift wrapping; then this project is for you.
The beauty of these gorgeous little boxes is that they are economical on product using only a sheet of 12x12” patterned paper to make two boxes. They can be made in 15 minutes which is a wonderful time saver!
Join me as I take you through my step-by-step process.
One piece Gift Box by Kim Watson

Supplies: Patterned paper, Gold Foils paper, Vellum Paper, Tags, Ephemera, Tickets & Die-cuts: +Fancy Pants Designs Burlap & Bouquets collection.
Instructions:
- Cut a piece of patterned paper 10.5” x 6”.
- Score horizontally: 1.75”, 1.5”, 3”, 1,5”, 2,5”.
- Score vertically: 1.5”, 3”, 1.5”.
- Fold along score lines, snipping all the flaps free to the 1.5”mark.
- Fold & adhere the first box flap closed.
- Fold it towards the inside of the box. Fold up side flaps & adhere in place.
- Fold top box flap, adhering the sides. NOTE: make sure to place the adhesive out of the way to allow for the flaps to slip into & out of the box easily.
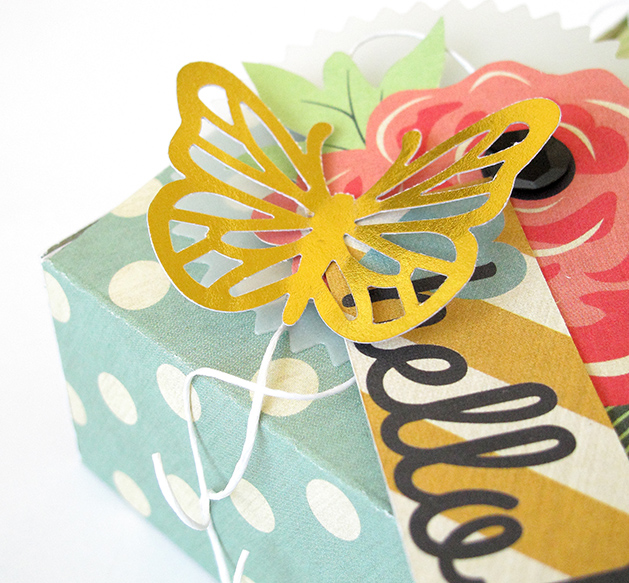
- Die cut a pinked edge vellum circle & layer it together with ephemera, a tag sentiment, punched gold butterflies and twirled twine
Fill your completed box with small gifts or candy. I hope this has inspired you to try making some too! I can’t wait to hand mine out after at our Valentine's day breakfast cook up with a bunch of special friends!

Decorate with sweet little butterflies, punched from gold foil & some paper twine for a pretty touch! They are sure to be a hit with all your special friends & family members!

All done! ENJOY your day!
No comments:
Post a Comment
Th♥nks for your comments!